CI rsync Deployment
Thursday, 2 June 2016Continuous integration (CI) is the practice, in software engineering, of merging all developer working copies to a shared mainline several times a day – Wikipedia
There are many ways to skin a cat. The same could be said for deploying compiled code, especially static sites. This site is statically generated with Hugo. Therefore, maintenance, hosting, and deployment are trivial. I personally host all of my private Git repositories, including this site, on GitLab. Fortunately, Gitlab has a free (at the time of this post) CI, GitLab CI, available for public and private repositories. There are many examples for CI configurations for GitLab CI. For example, there is this one for Hugo that I used for this site.
.gitlab-ci.yml
The base config that GitLab suggests for its GitLab pages with Hugo looks like the following.
image: publysher/hugo

pages:
  script:
  - hugo
  artifacts:
    paths:
    - public
  only:
  - master
This is simple enough, and will work perfectly for you if you soley want to host a GitLab page. However, I host my site on my own personal server and only use GitLab pages as a fallback if my server is down. Therefore, I came up with the following configuration.
image: publysher/hugo

before_script:
  - apt-get update
  - apt-get --yes --force-yes install git
  - git submodule update --init --recursive

pages:
  script:
  - hugo
  - echo "${SSH_PRIVATE_KEY}" > id_rsa
  - chmod 700 id_rsa
  - mkdir "${HOME}/.ssh"
  - echo "${SSH_HOST_KEY}" > "${HOME}/.ssh/known_hosts"
  - rsync -hrvz --delete --exclude=_ -e 'ssh -i id_rsa' public/ tblyler@piwik.tonyblyler.com:/var/www/htdocs/tonyblyler.com/

  artifacts:
    paths:
    - public
  only:
  - master
As you can see, this is more or less an addition to the base configuration that GitLab supplied.
Let’s see what each component does…
image: publysher/hugo
Here we are stating that we will be using the hugo docker image for our static site generation. Don’t know what Docker is? Go here and get educated!
before_script:
  - apt-get update
  - apt-get --yes --force-yes install git
  - git submodule update --init --recursive
Before we actually compile the static site, we need to add some applications that are not installed on the Docker image by default. This is soley because GitLab does not pull Git submodules by default.
If you do not have Git submodules, go ahead and remove the whole before_script section.
This Docker image is based off of the Linux distribution Debian, which uses the aptitude package manager.
This means we have to run apt-get update to update the package repository, and then run apt-get --yes --force-yes install git to install Git without any user interaction.
Finally, git submodule update --init --recursive is executed to initialize and update all Git submodules for this repository.
pages:
  script:
  - hugo
  - echo "${SSH_PRIVATE_KEY}" > id_rsa
  - chmod 700 id_rsa
  - mkdir "${HOME}/.ssh"
  - echo "${SSH_HOST_KEY}" > "${HOME}/.ssh/known_hosts"
  - rsync -hrvz --delete --exclude=_ -e 'ssh -i id_rsa' public/ tblyler@tonyblyler.com:/var/www/htdocs/tonyblyler.com/
Finally, the real meat of the configuration file. This is what is actually executed to compile and deploy the repository.
pages is simply an identifier for the job, which is borrowed from the base configuration.
script states that its members are shell commands that need to be executed.
Now there are a couple shell variables that need to be noted before going forward.
Those variables are ${SSH_PRIVATE_KEY} and ${SSH_HOST_KEY}.
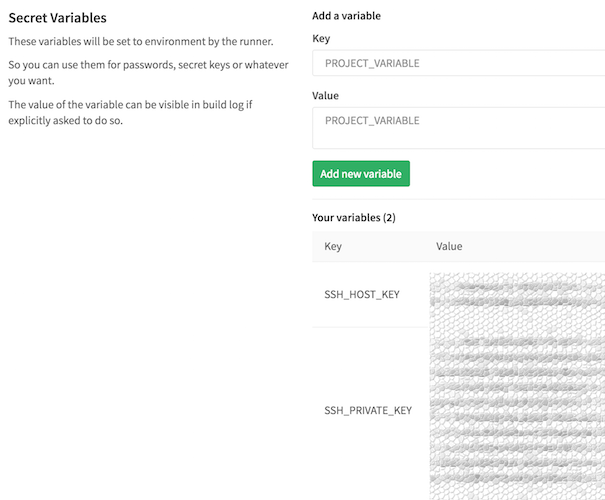
They are defined through GitLab CI User-defined variables, thus hiding them from the repository and build logs.
Before I dive into how to set these variables, I first need to go over how to generate the values for them.
${SSH_PRIVATE_KEY}
You more than likely know how to generate an SSH keypair, but here is a quick step-by-step in case you forgot.
On a *nix system that has OpenSSH or a similar toolkit installation, run ssh-keygen.
You will be prompted for a path to store your private key, type in id_rsa when asked for input.
Also, be sure to simply press enter when prompted for a password both times.
You should now have two files in the working directory from where you ran ssh-keygen, id_rsa and id_rsa.pub.
id_rsa is your SSH RSA private key and id_rsa.pub is your SSH RSA public key. Take note that id_rsa is the value of ${SSH_PRIVATE_KEY}.
${SSH_HOST_KEY}
To find the value of ${SSH_HOST_KEY}, on your *nix system that has OpenSSH or a similar toolkit installed, run ssh-keyscan ${YOUR_HOST_HERE}, replacing ${YOUR_HOST_HERE} with the public location of your remote host.
Once you execute that command, you should be given a line similar to tonyblyler.com ssh-rsa AAAA3NdzxcvMSDF+dfasdfuwoieur73829+df-/jdalksidiIwdgasdf09we8r2730r2j3ra09dfjasdf=+-dkjfasodfij8dvjznxdj198wsdvoz. Take note that this line is the value of ${SSH_HOST_KEY}.`
~/.ssh/authorized_keys
Now, to actually put the ${SSH_PRIVATE_KEY} to use, we need to put the id_rsa.pub file’s content (which is the RSA public key for the private key), we need to add its value to the ~/.ssh/authorized_keys file on the remote host.
This is the line I have in ~/.ssh/authorized_keys for my remote host…
command="rsync --server -vrz --delete . /var/www/htdocs/tonyblyler.com/",no-port-forwarding,no-x11-forwarding,no-agent-forwarding ssh-rsa AAAAB3NzaijsdfioajsdofijasodifjOIJDFOISJDFIsjdf=-df83487r298fjaodjsfOISJDFOSIDuf8df8ajsdflqn3fnasd9fa8sdf8a7efqj34ojqfalwdkjfasdofiJSODIFJOSDJfdoauifj/a/aweijfqoiwejqoijewrqr/2l3rjkadofjapsoidfj-+098-d8 tb-ci-gitlab-sync
Replace the content starting with ssh-rsa to the end of the line with the contents of id_rsa.pub and change the destination from /var/www/htdocs/tonyblyler.com/ to the path that your web server looks for files.
The options before the ssh-rsa position denote that the client can only run the given command with no x11 options nor ssh agent manipulation.
Putting it All Together in GitLab
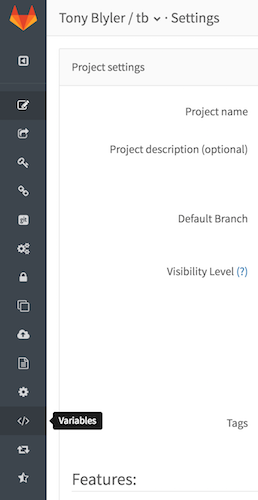
Finally we can add the ${SSH_PRIVATE_KEY} and ${SSH_HOST_KEY} variables to GitLab. In the following steps…


After completing the three steps above, any commit you make should now automatically generate your site and rsync it to your remote host. As you could have guessed, this can easily be adapted to other deployments aside from static sites. Feel free to adapt this to what you want.